The nail world loves styles that feel cozy and fun. Gingerbread nails turn every fingertip into a tiny holiday cookie. Their warm browns, creamy whites, and candy-like dots bring instant cheer. Friends notice the playful design, and photos pop on social media. This sugary look is simple enough for beginners yet striking enough for pros.
What Exactly Are Gingerbread Nails?
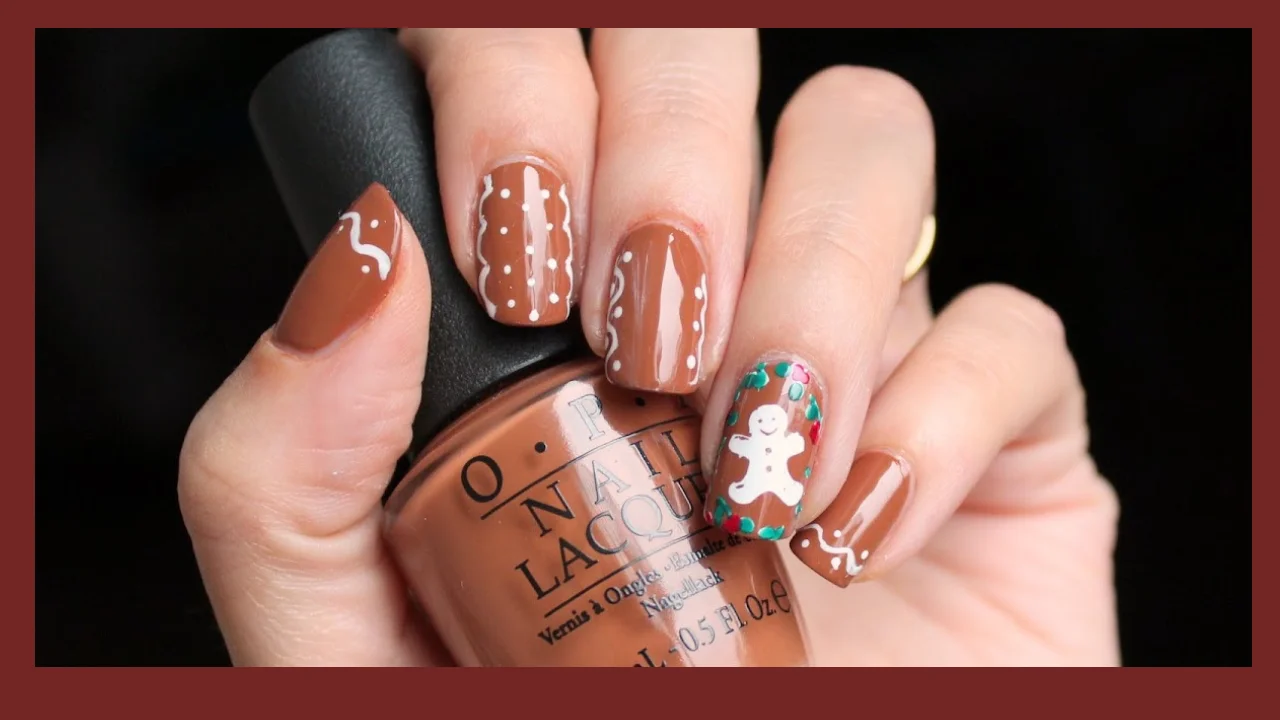
Think of iced gingerbread men shrunk to nail size. Each nail shows spiced brown polish for “cookie” base and white frosting lines for details. Little candy buttons, bows, or smiles finish the art. Because the palette stays neutral, gingerbread nails flatter every skin tone. You can keep patterns identical or mix smiles, zigzags, and hearts for variety.
ALSO READ: Newsweek Wordle Hint Today Game Changer
Why Gingerbread Nails Became A Holiday Favorite
Holiday manicures must feel festive without clashing with outfits. The soft cinnamon shade pairs well with reds, greens, golds, and even office neutrals. Social feeds amplified the style after influencers posted tutorials in 2023. DIY fans loved that common household tools—like toothpicks—could replace fancy brushes. As a result, gingerbread nails now rival classic red polish in December salons.
Essential Tools And Supplies
You need only a small kit to start. A rich mocha or milk-chocolate polish forms the cookie base. Grab an opaque white striping polish or gel pen for icing. A thin detailing brush, dotting tool, and toothpicks help draw eyes and buttons. A high-shine top coat seals designs and adds “glaze.” If you want longer wear, pick a gel system with LED lamp.
Preparing Your Canvas: Nail And Skin Care
Healthy nails hold art longer. File into a gentle squoval shape, then buff lightly to remove oil. Push back cuticles with a wood stick after soaking fingers in warm water. Apply hydrating cuticle oil but wipe excess before polish so layers grip. Taking five extra minutes here shrinks chips and lets gingerbread nails last past all the cookie parties.
ALSO READ: Ar15.Com Forum Customization And Support
Step-By-Step DIY Gingerbread Nail Tutorial
- Swipe on a clear base coat to stop staining.
- Paint two thin coats of brown. Let each layer dry for two minutes.
- With white polish, draw a wavy line across the tip—this is icing.
- Add three dots down the center as candy buttons.
- Use a tiny brush to paint a curved smile and two eyes.
- Seal everything under a glossy top coat.
Follow the same process for every finger or only accent nails. Either way, you will say the focus keyword naturally: your cheerful gingerbread nails are ready!
Creative Twists On The Classic Look
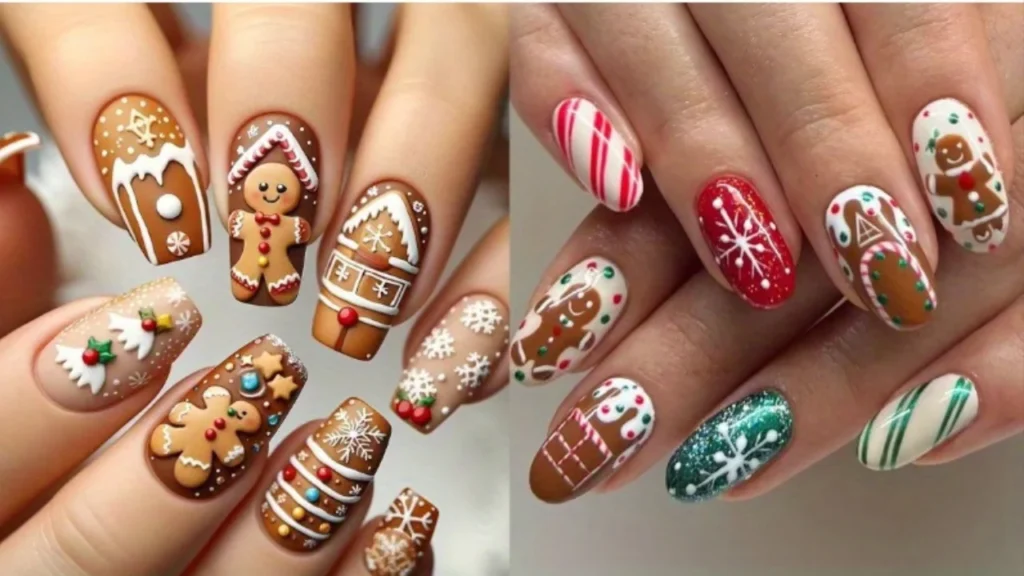
Designers keep inventing spins that still read “cookie.” Try matte top coat for a biscuit finish. Swap white icing for metallic gold to match party jewelry. Add micro-glitter to mimic sugar crystals. For subtle style, paint just the ring finger cookie while others stay cream. Each twist keeps gingerbread nails fresh yet unmistakable.
Salon Services And Pricing
Most salons label this art “festive hand-paint.” Prices vary by region. A basic set on natural nails costs about the same as a French manicure. Full gel extensions with 3-D gumdrop charms cost more, yet they survive long vacations. Show your artist inspiration photos so time and cost stay clear. Mention you want classic gingerbread nails to avoid surprise upcharges.
How To Make Gingerbread Nails Last Longer
Long wear begins before polish. Wash hands with oil-free soap, then swipe nails with rubbing alcohol. Between cookie swaps, wear rubber gloves while washing dishes. Reapply top coat every three days for extra seal. Never use nails as tools; peel tape with fingertips, not tips. Follow these habits and your gingerbread nails often stay chip-free for ten days.
Matching Outfits, Accessories, And Occasions
Brown and white look lovely with cream sweaters, plaid scarves, and emerald dresses. Stack rose-gold rings to echo ginger warmth. For an office potluck, pair gingerbread nails with a beige blazer—they appear polished yet playful. At night, grab a velvet clutch in burgundy; the contrast makes frosting lines stand out under twinkling lights.
Safe Removal Without Damage
Never pry polish. Soak cotton in gentle remover and press on nails for ten seconds. Slide off color with a firm wipe. For gel, rough the surface lightly, wrap with remover-soaked pads, and wait twelve minutes. After removal, massage cuticle serum and hand cream to replenish moisture. Healthy nails recover fast, so you can wear gingerbread nails again next week.
Nail Health Tips For Frequent Holiday Artists
Constant art without breaks weakens plates. Give nails one paint-free week between major holidays. Eat foods rich in biotin—eggs, almonds, and lentils—to strengthen keratin. Keep a glass file in your bag to smooth snags before they tear. Hydrate cuticles nightly; healthy skin frames the cutest gingerbread nails and any style you try later.
Trend Forecast: Gingerbread Nails Beyond December
While born as a Christmas theme, designers now adapt the cookie for all winter. Valentine’s Day sees pink icing hearts on warm biscuit bases. In autumn, deeper caramel shades pair with pumpkin coffee cups. Brands plan stick-on decals so beginners can achieve gingerbread nails in minutes. Expect the style to remain a sweet staple each year.
Eco-Friendly And Vegan Polish Choices
Many polish lines now use plant-based solvents and recycle bottles. Search for formulas free from formaldehyde, toluene, and DBP. Vegan brushes replace animal hair with nylon yet still create crisp icing lines. Choosing green products lets you flaunt gingerbread nails while respecting the planet—double holiday joy.
Cultural Roots Of Gingerbread Inspiration
Gingerbread dates back to medieval Europe, where spiced cookies were shaped into people for festivals. Immigrants carried the treat to new continents, and it became a symbol of warmth during cold months. Nail art borrows that heritage, turning a tasty icon into everyday fashion. Wearing gingerbread nails connects modern style to centuries-old celebration.
Common Mistakes And Quick Fixes
Smudged icing happens when layers stay wet. Speed dry by dipping nails in icy water for sixty seconds. Lumpy buttons form if polish is thick; thin with one drop of remover. Forgetting top coat dulls shine and shortens life. Correct these errors fast so your gingerbread nails look bakery-perfect.
Celebrating With Kids And Family
Children love mini makeovers. Use non-toxic peel-off polish for easy cleanup. Let kids dot candy buttons while you handle outlines. Enjoy hot cocoa together while nails dry. The shared craft makes sweet memories and teaches safe art habits. A family afternoon ending with matching gingerbread nails beats any store-bought gift.
Photographing Your Gingerbread Nails For Social Media
Good photos depend on light. Shoot by a sunny window or under a daylight lamp. Hold a real cookie for a playful prop. Use phone macro mode for crisp frosting lines. Edit only brightness and crop; heavy filters hide details. Add the hashtag #gingerbreadnails so fans find your work and the term counts again: your eighth mention of gingerbread nails is right here.
Conclusion: A Sweet Tradition At Your Fingertips
Holiday beauty should feel joyful, not stressful. This style turns simple polish into tiny desserts that never spoil. With the right tools, care, and imagination, anyone can craft bakery-ready fingertips. Embrace the warmth of cinnamon hues, the charm of icing smiles, and the delight they give every handshake. Make gingerbread nails part of your yearly traditions, and carry sweet cheer wherever you wave.